|
|

Welcome to our FAQ (frequently asked questions) page.
|
|
|
|

|
|
|
|
This list is a just a few of the questions we get asked about the
Multi-Ball location gage. If you have other questions, give us a call
at 317-899-0899 or send e-mail to
|
|
|
|
How
is Multi-Ball different from other gages?
-
Multi-Ball utilizes a patented
design that centers a pin inside a pattern of balls (Fig. 1). This simple
concept aligns the pin with the thread axis. No other product
has this system.
-
Multi-Ball's
centering action is mechanically activated and controlled by the user. The balls can be positioned anywhere along the
thread. No other product offers this level of control.
-
Multi-Ball
is a precision assembly with radially moving balls. Other designs are
one piece and have no moving parts.
-
Multi-Ball is designed to
use two point
axis definition. Other designs discourage this tolerance
saving technique.
-
Multi-Ball
contacts only the workpiece thread flanks. Other gages rely on
other workpiece features which can induce errors.
|
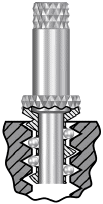
Basic Multi-Ball Concept
Fig 1
(Simplified Illustration)
|
return to top
|
|
|
|
How
is ball contact different from the plug gages?
Regardless of the
brand or design, plug type thread location gages are essentially
"Go" plugs. The flank surface of these plugs can only
contact the high points in the hole. These high points are always
unknown because they vary from hole to hole and may not even be functional
thread features. As a result, it is impossible for the plug to
distinguish between a burr, foreign material, or the desired thread form.
With ball contact,
the point of contact on both the flanks as well as the axial location is
known. The advantage of this is that you are assured the gage is
always locating on the functional surface of the thread and not on some
other feature or deformation that would induce errors into the X-Y
position data.
return to top
|
|
|
|
Why
should I consider using Multi-Ball location gages?
Because you want more tolerance. Gage and
inspection process
uncertainties rob you of significant amounts of tolerance that should be
applied to manufacturing.
Less usable tolerance makes manufacturing more costly.
Multi-Ball location gages allow you to use the maximum amount of the
stated tolerance by reducing gage and process uncertainty in two ways:
-
The centering action of Multi-Ball reduces gage
alignment errors.
-
The Multi-Ball design allows the use of two point
axis definition. This eliminates the errors inherent to single point
axis definition.
return to top
|
|
|
|
Why
do Multi-Ball gages have a long pin surface?
| Multi-Ball thread location gages have a
pin that increases in length and diameter as the thread size
increases. This provides a surface sufficient for defining
two points on opposite ends of the pin. The farther apart
the two points are from each other the less any error is
multiplied when the points are connected to define an axis.
This longer length allows the two point
axis definition method to be used. Shorter pin lengths on other gages are primarily used with the single point axis
definition method. |
 |
return to top
|
|
|
|
When threaded holes are specified in a manner similar to the
illustration above, the thread axis is permitted to be at an angle to the
primary datum -A- as long as the axis is within the .010 diameter X .50 long
tolerance zone.
|
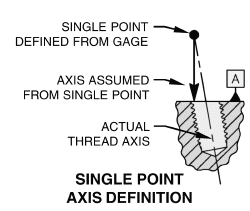
The single point axis definition method ignores the true
orientation of the thread axis and projects an assumed axis perpendicular
to the primary datum. When this method is used with inaccurate
thread location gages, errors accumulate dramatically and the resulting data becomes in
doubt.
Essentially, the single point axis definition method is inspecting the thread location
to a flat two dimensional "circular tolerance zone" not a "cylindrical
tolerance zone" as specified.
|

Fig. 3
|
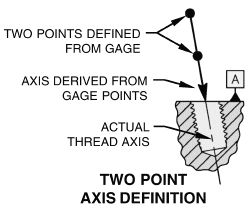
| The two point axis definition method makes no assumptions
about the thread axis orientation. Instead, this method
identifies the thread axis orientation.
Once the axis orientation is defined, it is simple to determine
if the axis is within the three dimensional
"cylindrical tolerance zone".
|

Fig. 4
|
return to top
|
|
|
|

|
|
|
|
[ Home ] [ How Is It Used ] [ Usage Instructions ] [ Custom Micrometers ] [ Custom Location Gages ] [ Contact Us ] [ Location Gage FAQ ] [ Press Release ]
|
|
|
|
|
|


